
Table of Contents · 23 Chapters
- 00Common Audio Terminology
- 01Installation & First Playback
- 02Understanding the Interface & Settings
- 03Finding Music & Managing Library
- 04Playback Queue & My Playlists
- 05Understanding Bit-Perfect Passthrough
- 06PCM Sample Rates & Three Policies
- 07PCM Configuration Examples
- 08Filtering, Dither & Protection
- 09SDM & DSD Output Settings
- 10Playing DSD Files & Selecting Transport
- 11Output Devices, Buffers & GPU Acceleration
- 12EQ & Headphone Presets
- 13Acoustic Calibration & Room Correction
- 14Now Playing, Lyrics & Audio Analysis
- 15Metadata & AI Music Curation
- 16Tag Writeback, Covers & Data Backup
- 17Network Streaming, Input & Capture
- 18Troubleshooting No Audio & Stuttering
- 19Logs, Diagnostics & One-Click Feedback
- 20Updates, Backups & Common UI Questions
- ACommon Shortcuts & Audio Formats
- BData Files & Feedback Channels
| What Do You Want to Do? | Where to Start |
|---|---|
| Start listening right away | Chapter 1: Installation & First Playback |
| Preserve raw source samples untouched | Chapter 5: Understanding Bit-Perfect Passthrough |
| Configure upsampling & sample rates | Chapters 6–8: PCM & Filtering |
| Play or output DSD audio | Chapters 9–10: SDM & DSD Sources |
| Tune headphone or room acoustics | Chapters 12–13: EQ & Acoustic Calibration |
| Find tracks & organize library | Chapter 3: Finding Music & Managing Library |
| No sound or playback stuttering | Chapter 18: Troubleshooting No Audio & Stuttering |
Common Audio Terminology
| Term | Plain English Explanation |
|---|---|
| PCM | The standard representation for digital audio. Files like WAV and FLAC typically follow this playback pipeline after decoding. |
| Sample Rate | How many audio samples are captured per second. 44.1 kHz means 44,100 samples every second. |
| Bit Depth | How many bits of numerical precision represent each sample. Increasing output bit depth cannot recover nuances absent from the original recording. |
| DSD & SDM | DSD is high-frequency 1-bit audio; SDM is the sigma-delta modulation process that converts multi-bit audio into such bitstreams. |
| Backend | The software pipeline connecting the player to hardware endpoints, such as WASAPI or ASIO. |
| DoP & Native | Two transmission methods for DSD. DoP encapsulates DSD inside PCM-style frames, while Native routes directly via dedicated ASIO channels. |
| DSP | Digital Sound Processing, encompassing upsampling, digital volume, EQ, convolution, and more. |
Higher sample rates, higher modulator orders, or longer filters do not automatically guarantee better sound. Prioritize hardware compatibility and stable playback before evaluating your listening preferences.
Installation & First Playback
Preparing the Official Release
Download the complete win64 ZIP bundle, extract it, and double-click RLPlayer.exe. Keep the accompanying runtimes, WebView2Runtime, decoders, data, and tools intact in the same folder—do not isolate just the executable.
The official release includes built-in web runtimes, FFmpeg decoders, and necessary GPU runtime libraries; no separate ROCm, external codec packs, or development SDKs are required. Ensure your system has functional display and audio drivers; ASIO playback requires the manufacturer's ASIO driver.
Extract the application into a standard user-writable folder, such as an RLPlayer folder on a non-system drive. Settings and caches are written adjacent to the program directory; avoid running directly inside Program Files where administrator write permissions are enforced.
First-Time Playback Checklist
- Launch RLPlayer.exe and follow the prompt to add your music directory, or go to Settings → Advanced → Local Music Library to add folders.
- Open Settings → Output and select your active DAC, sound card, or audio endpoint. Avoid relying on "Default Device" to guess where sound will play.
- Select PCM output. Use WASAPI Shared to coexist with system audio, or WASAPI Exclusive / manufacturer ASIO for direct hardware access.
- In Settings → PCM, leave Source Sample Rate (Passthrough) and Prefer Same Family (Default) selected, then click "Save Settings."
- Lower the hardware volume on your amplifier, headphone amp, or active speakers first. Navigate to an album in the library and start playback, then gradually increase volume to a comfortable level.
- Monitor the bottom playback bar for progress, active output specifications, and status indicators. Open the Signal Path for detailed stage inspection.
Confirming a Successful Launch
The album library displays correctly; the target device appears in the device list; audio plays with advancing progress bars and zero error alerts. Initial indexing of large libraries or remote metadata fetch may take a moment, during which UI browsing remains fully responsive.
During WASAPI Exclusive playback, other system applications cannot output sound to the same device. Clicking × in the window title bar minimizes the app to the system tray; to exit completely, right-click the tray icon and select Exit.
Understanding the Interface & Settings
| Interface Zone | How to Use |
|---|---|
| Left Sidebar Navigation | Albums, Artists, Tracks, Folders, and Streaming help you discover music; Playback Queue, History, Favorites, and My Playlists organize your listening sessions. |
| Top Search Bar | Quickly search by album, artist, or track title. Press Ctrl+F to focus the search input instantly. |
| Main Content View | Displays album details, track listings, settings tabs, or the active Now Playing view. |
| Bottom Playback Bar | Play/Pause, Previous/Next, Stop, progress seek bar, volume slider, playback modes, and live status. Click the album cover thumbnail to open the Now Playing view. |
| Right Drawer Panel | Inspect the playback queue or lyrics; collapse the drawer to expand the main view. |
| Signal Path | Inspect source format, active output format, applied DSP stages, and bit-perfect verdicts. Press hotkey 'i' to open. |
Settings Tabs Breakdown
| Tab | Purpose & Configuration |
|---|---|
| Input / Output | Input handles recording and loopback capture; Output configures playback backend, device, channel mapping, buffer size, and loudness management. |
| PCM/SDM | PCM configures output sample rate, bit depth, and upsampling filters; SDM handles DSD output rates, encapsulation, and modulators. |
| Advanced | Themes, UI language, GPU acceleration, local library directories, and audio analysis toggles. |
| EQ / Calibration | EQ handles manual parametric equalization and headphone presets; Calibration manages measurements, microphone calibration files, and external correction filters. |
| Metadata / Streaming | Metadata completion and AI integration; network music servers and UPnP casting. |
| Diagnostics / About & Updates | Submit feedback, preview diagnostic payloads, inspect release versions, and check for updates. |
Most settings take effect on the next track playback after clicking "Save Settings." PEQ parameter adjustments apply immediately and auto-save; instant actions like language switching follow page prompts.
Finding Music & Managing Library
Albums & Artists
The Album view is ideal for browsing by cover art. Click an album cover to view details, then select "Play Album" or "Add to Queue." "Add to Queue" appends tracks to the end of the current queue without interrupting active playback.
The Artist view displays albums and tracks grouped by musician or ensemble. Covers, artist portraits, and online biographies load asynchronously; temporary missing images never prevent audio playback.
Tracks & Folders
The Track view allows searching, sorting, and context actions. Click "+" in any row to append a track to the queue. Right-click to view details, add to queue, or launch track version comparisons.
The Folder view navigates music by physical file paths on disk. Recently added tracks not yet scanned into the database can be played directly from folders. CUE sheets appear as distinct virtual tracks while pointing to the single underlying audio file.
Adding & Rescanning Folders
- Navigate to Settings → Advanced → Local Music Library.
- Enter the folder path and click "Add Directory." You can add multiple library locations.
- When adding, moving files, or editing ID3 tags, click "Rescan All" to refresh your database.
- If tracks fail to appear, verify that the directory exists, network drives are mounted, and files are supported formats.
Favorites & Playback History
Click the heart icon next to any track to add it to "My Favorites." "History" lets you quickly revisit recently played songs; to permanently store custom track sequences, use "My Playlists."
The library database indexes physical file locations. If drive letters change, folders move, or you migrate to a new PC, ensure file paths remain valid and re-add or rescan directories. Backing up the database does not copy physical music files.
Playback Queue & My Playlists
The playback queue is an ordered track list with an active playback pointer. Adding, removing, and sorting operate directly on this list. Playlists are saved queues that can be restored at any time.
| Action | Operation |
|---|---|
| Add single track | Click "+" on a track row, or right-click → Add to Queue; the Queue page also features "+ Add Tracks." |
| Add entire album | Album details → Add to Queue. To play the entire album immediately from track one, select Play Album. |
| Remove a track | Click "×" on the queue item, or right-click → Remove from Queue. |
| Reorder queue | Use the queue sort menu to order by title, artist, album, duration, year, reverse list, or shuffle randomly. |
| Undo sorting | "Undo Sort" appears after sorting; modifying the queue by adding or removing tracks invalidates this undo snapshot. |
| Clear queue | Click Clear Queue and confirm. |
| Save queue for later | Save as Playlist, provide a name, and access it anytime from "My Playlists" in the left sidebar. |
Playback Modes
The bottom playback bar toggles between Stop at End, Loop Album/Queue, Repeat One, and Shuffle. Shuffle Mode and "Shuffle Queue" are distinct: the former selects random playback order, while the latter reorders the physical queue items.
Saving & Restoring Queues
The active queue and saved playlists persist to local storage across application restarts. CUE track start and end boundaries are fully preserved. When backing up application data, retain queue and playlist configurations.
Practice Tip: Add three tracks to the queue, sort them by title, undo the sort, and save them as a test playlist. Confirm that "Queue Order" and "Now Playing Track" are two independent concepts.
Understanding Bit-Perfect Passthrough
Bit-perfect playback means audio samples are transmitted without numerical alteration across the specified path. It reflects data integrity, not an aesthetic sound quality score. EQ, volume attenuation, and upsampling are intentional DSP; displaying "Non Bit-Perfect" during their use is the expected behavior.
PCM Bit-Perfect Requires Meeting All Conditions Simultaneously
- Output sample rate matches source sample rate. Selecting "Source Sample Rate" requests passthrough, but actual delivery depends on hardware clock support.
- Software volume is set to 0 dB; no active channel trims, delay compensation, channel mixing, routing, or loudness DSP.
- Dither/noise shaping is set to None, ReplayGain is disabled; no active PEQ, convolution IR, room correction, or pre-attenuation.
- Output bit depth is greater than or equal to source bit depth. Losslessly zero-padding 16-bit samples into 24-bit words does not degrade precision, whereas truncating 24-bit to 16-bit alters audio data.
- Use a direct hardware backend. WASAPI Shared routes through the Windows audio engine and cannot guarantee bit-perfect delivery.
Using the One-Click Bit-Perfect Button
Settings → Output → "Switch to Bit-Perfect Passthrough" reconfigures active settings. If volume is not at 0 dB, the app will ask to reset software volume to 0 dB. 0 dB disables software attenuation and can result in significantly louder playback; turn down your hardware amplifier first. Declining volume reset leaves other settings adjusted, but bit-perfect status may not be achieved.
Verify via Status Indicators and Reasons
The bottom status badge and Signal Path distinguish Bit-Perfect, Processed, DSD Passthrough, Lossy Source, and Unconfirmed states. The Signal Path explicitly lists active DSP causes: Resampling, Volume, Dither, Preamp, EQ, etc. Matching input/output formats alone does not prove samples are unmodified.
Lossy files like MP3 and AAC permanently discard audio data during compression. The downstream audio chain cannot reconstruct lost acoustic information into an original lossless recording.
DirectSDM same-rate DSD passthrough requires meeting dedicated DSD conditions. PCM-to-DSD conversion and DSD remodulation alter bitstreams and do not constitute bit-perfect passthrough of raw source samples.
PCM Sample Rates & Three Policies
Understanding Two Sample Rate Families
The 44.1 kHz family spans 44.1, 88.2, 176.4, 352.8, and 705.6 kHz; the 48 kHz family spans 48, 96, 192, 384, and 768 kHz. 44.1→176.4 is same-family; 44.1→192 is cross-family. Any change in sample rate constitutes active resampling, even within the same clock family.
| Policy | Automatic Selection Behavior | Manually Specified Cross-Family Rate |
|---|---|---|
| Prefer Same Family (Default) | Automatically selects rates within the source file's clock family; prompts with reasons if no same-family rate exists. | Permits explicitly chosen target rates if supported by hardware; clearly indicates active resampling. |
| Strict Same Family | Enforces same-family rates exclusively; rejects playback if unavailable. | Rejected. Manual settings cannot bypass policy restrictions. |
| Compatible Resampling | Prioritizes same-family rates; permits cross-family fallback when no same-family rate is available. | Validates policy and hardware capabilities before applying target; conversion is explicitly disclosed. |
How to Choose Output Sample Rate
| Option | Technical Meaning |
|---|---|
| Source Sample Rate (Passthrough) | Preserves source sample rate whenever possible; subject to hardware capabilities and family policies. Does not independently guarantee bit-perfect delivery. |
| Auto (Highest by Family Policy) | Selects the highest hardware-supported rate permitted by the active family policy. |
| Follow System | Uses the system audio engine mixer rate as reference, constrained by family policies and hardware validation. |
| Explicit Target Rate | E.g., 176400 or 192000 Hz. Represents an intentional manual override, never silently substituted if unsupported. |
In Shared mode, Windows may lock the final output to the system mixer rate. RLPlayer verifies this actual hardware rate; if it violates current family policies, playback may be refused. Select a compatible Exclusive rate or switch to Compatible Resampling—silence does not mean the file is corrupted.
PCM Configuration Examples
Location: Settings → PCM. The screenshot below shows an authentic window build of the 3.0.9 official release for default PCM layout reference. Operational instructions apply to 3.0.10; this image does not illustrate the new SDM implementation.
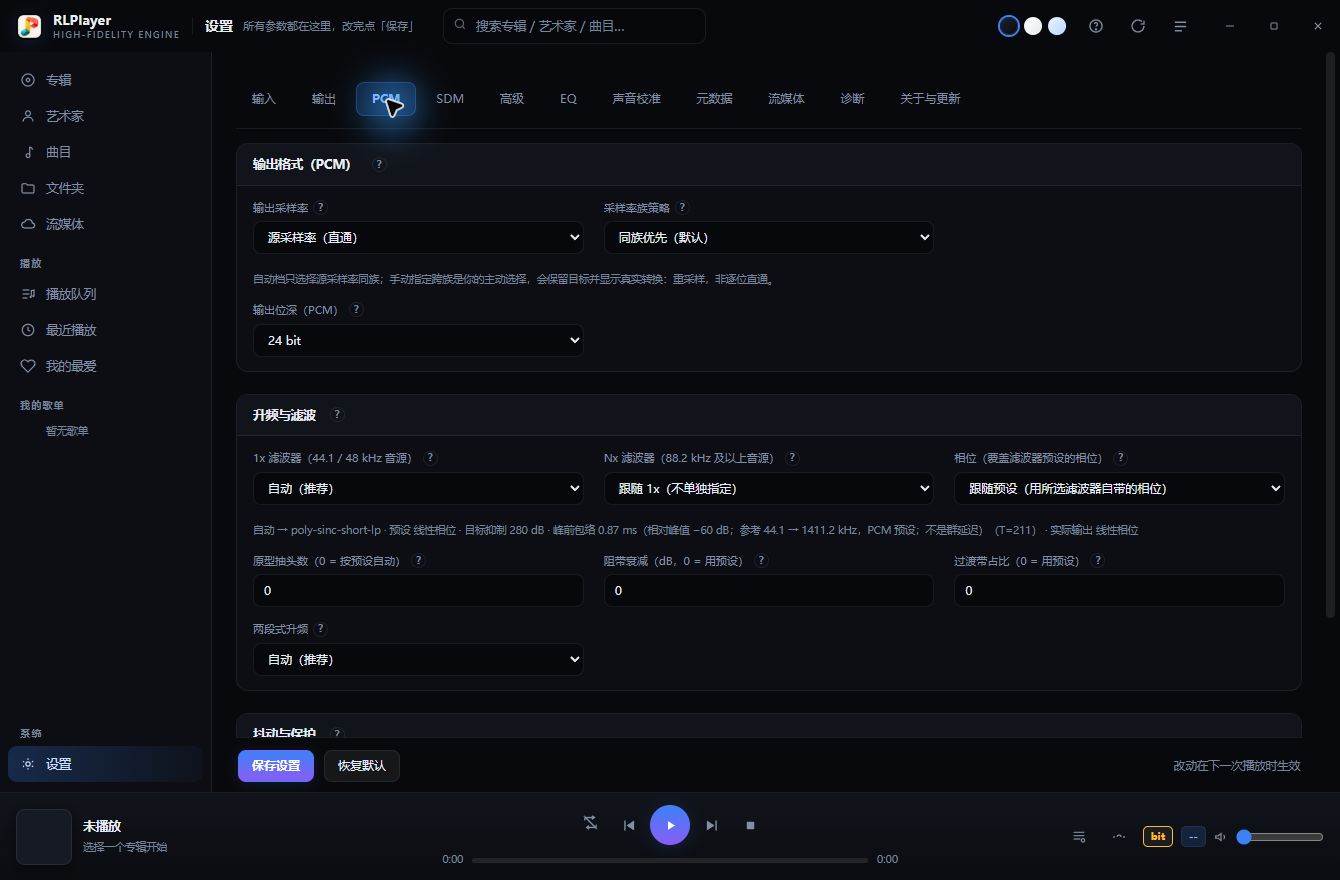
Fig. 1 RLPlayer 3.0.9 Source Sample Rate & Prefer Same Family
Three Common Scenarios
| Scenario | Configuration & Assessment |
|---|---|
| Preserve native 44.1 kHz file rate | Source Sample Rate + Prefer Same Family; verify endpoint operates at 44.1 kHz. Confirm volume, dither, and EQ conditions. |
| Upsample 44.1 kHz to 176.4 kHz | Select 176400 Hz manually, or use Auto Highest on compatible gear. Operates as same-family resampling; not bit-perfect. |
| Explicitly output 44.1 kHz as 192 kHz | Prefer Same Family allows this manual choice; Strict Same Family rejects it. If hardware lacks 192 kHz, select a supported rate. |
When troubleshooting, change one setting at a time. Click Save, stop playback, and restart before verifying source vs. output rates in the Signal Path. Restoring defaults reverts to "Source Sample Rate" and "Prefer Same Family," resetting other customizations; note key parameters beforehand.
Filtering, Dither & Protection
1x and Nx Classify Filters by Source Sample Rate
1x applies to 44.1 / 48 kHz sources; Nx applies to 88.2 kHz and higher sources. Setting Nx to "Follow 1x" adopts the 1x filter. Selecting higher target rates does not automatically engage Nx filters. When source rate is preserved without resampling, configured filters do not intervene.
Start with Auto and Presets
If uncertain, choose "Auto (Recommended)" with "Follow Preset" phase. Default upsampling selects the optimal matching preset. Long filters require more computation and initialization latency; short filters are ideal for validating hardware and stream stability.
| Setting | Function & Recommendations |
|---|---|
| Linear Phase | Equal delay across all frequencies; impulse response exhibits symmetric ringing before and after the peak. |
| Minimum Phase | Impulse energy is concentrated up front, eliminating pre-ringing; phase relationships vary across frequency. |
| Intermediate Phase | Balances characteristics between linear phase and minimum phase. |
| Prototype Taps | Filter length. 0 automatically follows the preset; longer filters increase computational load without guaranteeing preferred sound. |
| Stopband Attenuation & Transition Band | Controls out-of-band rejection and transition edge sharpness; 0 uses preset defaults. These are design parameters; actual response depends on length and sample rates. |
| Two-Stage Upsampling | Automatically selected based on preset or pipeline; manual toggles override auto behavior. Leave on Auto initially. |
Dither & Oversampling Peak Protection
Dither introduces micro-level random noise during quantization to reduce harmonic distortion; noise shaping redistributes quantization noise to less sensitive frequency bands. 'Auto' selects dither based on output bit depth; 'None' disables it. Enabling dither forfeits bit-perfect passthrough.
Oversampling peak protection detects inter-sample peaks exceeding full-scale after interpolation, applying pre-attenuation when necessary. Active pre-attenuation indicates protective headroom management; the Signal Path displays the reason. Never ignore digital clipping simply to keep a bit-perfect badge lit.
When manually overriding phase, length, or transition bands, the original preset's nominal specifications no longer represent the modified filter. Decibel values in the UI reflect algorithmic targets, not DAC dynamic range or subjective quality scores.
SDM & DSD Output Settings
SDM converts multi-bit audio into high-frequency 1-bit streams. Playback succeeds only when your DAC, driver, and transport mode natively support the target DSD rate. Seeing DSD1024 in the dropdown does not guarantee your hardware can receive it.
- In Settings → Output, select your output device and backend, then set Output Mode to DSD.
- Navigate to Settings → SDM to configure target bitrate and encapsulation. Start with lower rates verified to work on your equipment.
- Use DoP when converting PCM sources to DSD; verify ASIO support before using Native with DSD sources.
- Leave filter and modulation parameters at default values, click Save Settings, and restart playback. Inspect the Signal Path for effective encapsulation, active bitrate, and protection status.
| Parameter | Technical Meaning |
|---|---|
| Oversampling 1x/Nx | Dedicated oversampling filter on the DSD output side. When left empty, follows PCM or the 1x filter above as annotated on the page. |
| Target Bitrate | Common rates: DSD64 / 128 / 256 / 512 / 1024, requiring progressively higher compute power and hardware capabilities. |
| DoP | Encapsulates DSD bitstreams inside PCM frames. DSD64 requires a 176.4 kHz carrier, DSD128 requires 352.8 kHz; higher rates demand higher carrier frequencies. |
| Native | Transmitted via dedicated ASIO native DSD channels. Driver support is required; WASAPI Shared cannot transport DSD / DoP. |
| Modulator Family & Order | Balances noise shaping against loop stability. Requested orders and effective safeguarded orders may differ. |
| Corner Frequency & Dither | Influences noise distribution and idle tones. Use defaults unless you have specific requirements. |
Current Safeguards & Operational Scope
- 1-bit Chebyshev output operates with 5th-order protection; requesting 7th order does not imply effective 7th-order output.
- Standard DSD and AHM non-EC paths at 45.1584 MHz or 49.152 MHz with default 100 kHz corner frequencies operate at full 7th order when requested, no longer falling back to 5th order. Other corner frequencies and parameters remain constrained by stability guards; do not generalize this across arbitrary configurations.
- AHM software modulation at 8-bit depth utilizes exactly 256 quantization levels; DoP and ASIO 1-bit transports in this project enforce 2-level quantization with explanatory notes. This does not indicate multi-level hardware output is currently supported.
Effective order, rate, and active processing in the Signal Path reflect true operational states. Protective order reductions do not indicate configuration save errors; real-time hardware acceptance of target DSD rates requires independent verification.
Playing DSD Files & Selecting Transport
Three Playback Paths
| Your Goal | Configuration & Result |
|---|---|
| Play DSF / DFF on standard hardware | Output PCM: Decodes DSD to PCM, then plays via PCM settings. Involves active conversion; not DSD passthrough. |
| DAC supports DoP with native DSD stream | Enable DirectSDM, matching target rate to source rate at 0 dB volume, with zero EQ, convolution, or channel alterations. Bypasses PCM and modulation when conditions are met. |
| DAC and ASIO driver support Native DSD | Select ASIO + DSD + Native. Source must be DSF / DFF and comply with software DSP bypass limits. |
Native is currently utilized for ASIO output of DSF / DFF files. Exact same-rate source and target achieve bit-perfect delivery; supported same-family integer rate conversions apply remodulation, forfeiting bit-level identity. PCM sources requiring DSD output should use DoP.
DSD-to-DSD rate conversion supports only supported same-family integer multipliers; cross-family, non-integer, or non-standard targets are explicitly rejected.
When DirectSDM Fails to Enter Passthrough
Verify source and target DSD bitrates match, software volume is 0 dB, and no EQ, IR, room correction, loudness, or channel processing is active. Failing any condition reverts to standard processing with reasons disclosed; standard paths may involve decoding and remodulation.
When Native DSD Is Unavailable
Confirm the device list selects the correct ASIO driver, and verify the driver's actual DSD capabilities. If the driver rejects Native DSD, the player may attempt DoP fallback if the hardware supports the required carrier. Parameter validation rejections indicate specific error conditions that must be resolved.
DSD to PCM Options
"DSD Source Decimator" includes FIR, IIR, and CIC options; Conversion settings (narrow, wide, XFi) govern retained bandwidth. These apply exclusively to DSD→PCM. Successful DirectSDM passthrough bypasses this decimation chain completely.
DoP must be recognized as DSD by the receiving DAC. Never audition DoP carriers as raw PCM; non-DoP hardware may decode the carrier as loud noise. During same-rate DSD passthrough, control volume safely at the DAC, headphone amp, or preamplifier.
Output Devices, Buffers & GPU Acceleration
Choosing Between WASAPI & ASIO
| Output Mode | Use Cases & Constraints |
|---|---|
| WASAPI Exclusive | Grants the player exclusive ownership of the audio endpoint. Recommended for bit-perfect and audiophile output; other system sounds are muted during playback. |
| WASAPI Shared | Coexists with browser, calls, and system audio. Final format is subject to the Windows mixer; does not guarantee bit-perfect delivery, and does not support DoP / DSD. |
| ASIO | Professional low-latency pipeline provided by audio hardware drivers. Verify driver installation and device capabilities; Native DSD requires dedicated driver support. |
| Null output | Executes digital DSP without streaming audio to physical hardware. Useful for inspecting signal chains silently, but does not prove hardware sound output. |
Buffers, Channels & Signal Levels
Smaller buffers reduce latency between user actions and sound, but increase the risk of buffer underruns. Begin with the default 100 ms for daily listening; try 200 ms if dropouts or clicking occur, and monitor statistics. If hardware throughput is insufficient, merely expanding buffer size will not resolve the issue.
Channel counts must match your audio files, driver capabilities, and physical wiring. Forcing stereo or multichannel can trigger active channel downmixing/upmixing; per-channel volume trims also modify digital samples. Volume ramping softens transitions but does not guarantee immunity from hardware-induced pops.
GPU Location & Status Interpretation
Location: Settings → Advanced → GPU. Options: Auto, AMD, NVIDIA, or Off. The GPU toggle for IR convolution resides on the Acoustic Calibration page. Runtimes are included in the bundle; GPU execution depends on local graphics hardware and driver availability.
GPU availability does not guarantee the active track is using GPU acceleration. A green node in the Signal Path indicates the stage actively executed on the GPU; if upsampling or convolution is inactive, an unlit indicator is normal. Missing backends or launch failures gracefully fall back to CPU.
If ultra-high sample rates or massive filters struggle with stability, reduce target rates or choose shorter filter presets. GPU acceleration applies to specific pipeline stages and cannot guarantee real-time playback across every extreme setting.
EQ & Headphone Presets
EQ intentionally reshapes frequency balance, such as taming room modes or adjusting headphone tonality. Each of the 20 PEQ bands offers configurable frequency, gain, Q factor, and filter type; higher Q narrows the affected bandwidth.
Understanding Bypass Semantics
Checking "Bypass" completely removes the PEQ engine from the processing pipeline. Unchecking it enables PEQ, but factory defaults (all 20 bands at 0 dB with 0 dB preamp) do not alter the audio signal. The Signal Path evaluates effective DSP; simply enabling an untouched EQ engine does not alter digital samples.
Manual Tuning Workflow
- Begin with subtle adjustments in a single frequency band rather than applying large boosts across multiple bands simultaneously.
- Drag filter nodes horizontally to adjust frequency and vertically to adjust gain; Shift + drag or mouse wheel adjusts Q factor. Double-click a node to reset it.
- Enter precise values in the parameter table when exact tuning is required. Select a row and use arrow keys for fine adjustments (hold Shift for accelerated steps).
- After boosting frequencies, click "Auto Preamp (Prevent Clipping)" to establish necessary headroom against digital clipping, then verify master volume.
- Adjustments apply immediately and auto-save; save as custom presets once satisfied. Use Bypass during A/B auditioning while monitoring loudness differences.
Headphone EQ & OPRA Integration
In Settings → EQ → Headphone EQ, search for your specific headphone model, select an author and target curve preset, then apply. Headphones with similar names, different revisions, or varying ear-pad styles should not be assumed identical.
Target curve previews illustrate general acoustic profiles, not laboratory measurements of your personal pair. Database presets offer reliable starting points; ear-pad seal, individual ear anatomy, and personal taste may warrant fine-tuning.
Active EQ alters digital audio samples, forfeiting bit-perfect passthrough. When comparing presets, match overall loudness to avoid mistaking increased loudness for superior sound quality.
Acoustic Calibration & Room Correction
Acoustic calibration compensates for playback system anomalies using measurements or external correction filters. Manual headphone EQ resides on the EQ tab; microphone calibration, room measurements, REW / AutoEq text, and WAV IR files reside in Settings → Acoustic Calibration.
Preparing Microphone Calibration
If your measurement microphone includes a factory calibration file, import the corresponding TXT or CSV first. Measurements can proceed without calibration files, but results will incorporate the microphone's native frequency response. Microphone calibration affects only measurement and correction filter synthesis—it does not apply an extra EQ layer during music playback.
Performing Room Acoustic Measurements
- Place the measurement microphone at your primary listening position (sweet spot) and select the appropriate input device, speaker outputs, and channel layout. Maintain a quiet environment during measurement.
- Open Room Correction → Start Wizard, select your layout, position the microphone, and follow each guided step.
- Confirm playback device, sweep duration, and test signal level. Frequency sweeps output audible sound at a default level of −20 dBFS; ensure a safe listening environment, check the acknowledgment box, and proceed.
- Avoid playing background audio or generating noise during sweeps; use the wizard's abort button if you need to stop early.
- Review the quality check and measured results upon completion to generate a correction profile for your layout. Start playback and inspect the Signal Path to confirm the correction profile is active.
Automatic Correction & External Files
Auto-apply correction is enabled by default, engaging only when a correction profile matches the active output layout. A 2.0 measurement will not be forced onto a 5.1 output. When specifying a custom IR file, the manual file takes precedence.
"Parametric EQ File" accepts Filter text exported from REW / AutoEq; "Impulse Response IR" accepts standard WAV files. These represent distinct correction methodologies and can be populated independently. Avoid stacking multiple correction files without clear purpose to prevent duplicate compensation.
Room correction requires calibrated physical hardware, accurate placement, and reliable acoustic measurements. Completing software computation does not automatically yield acoustic perfection in the room; active correction modifies digital samples and is not bit-perfect.
Now Playing, Lyrics & Audio Analysis
Now Playing View
Click the album art in the bottom playback bar to open the Now Playing page, offering a centralized view of format specifications, synchronized lyrics, biographical metadata, and audio analysis. Distinguish source format (native file specs) from output format (actual delivered audio).
AI metadata loads asynchronously in the background; the page displays cover art and track details immediately while biographies stream in. "Curating..." does not mean audio playback is waiting for AI.
Lyrics
Lyrics can be viewed in the right drawer and the Now Playing view. Timed lyrics scroll in sync with playback; manual scrolling temporarily detaches auto-follow before smoothly resuming. Missing lyrics, unindexed lyrics, and identified instrumentals represent distinct statuses. Online query results may occasionally mismatch release versions and cannot guarantee 100% accuracy.
Interpreting Analysis Results
| Analysis Metric | Diagnostic Value |
|---|---|
| Dynamics & Loudness | Inspect dynamic range and integrated LUFS to understand overall mastering loudness and compression. Different musical genres should not be ranked solely by a single number. |
| Peaks & Clipping | Detects indicators where audio or processing approaches full scale; does not evaluate physical speaker distortion. |
| Effective Bit Depth & Noise | Characterizes the analyzed digital audio stream; does not prove the end-to-end recording chain quality. |
| Lossy Transcoding Clues | Sharp high-frequency cutoff or brickwall roll-off provides clues for further verification, but a single metric cannot definitively determine file provenance. |
Two Tiers of Analysis Switches
Disabling the master switch in Settings → Advanced → Audio Analysis hides the analysis card and entries on the Now Playing view. Disabling only "Auto Analysis on Playback" allows manual on-demand analysis on the Now Playing view. Results are cached; auto analysis runs exclusively on local tracks, bypassing streaming, network shares, and Audio CDs.
Audio analysis is strictly read-only and requires no audible test tones. It provides diagnostic insights into file characteristics, not an automated verdict on album quality or sound fidelity.
Metadata & AI Music Curation
Metadata comprises "data about music": track titles, artists, albums, release years, cover art, and more. Local tags, public online databases, and AI curation represent distinct sources; online searches may occasionally confuse identically titled tracks.
Auto-Completion vs. AI Enrichment
| Output Mode | Requirements & Purpose |
|---|---|
| Auto-Completion | Uses enabled public databases to fetch tags and artwork. Requires internet access, but does not invoke AI models. |
| AI Enrichment | Uses configured LLM models to research and synthesize background context. Requires a valid API key, active connection, and account credits. |
| Local Playback | Decoding and sound processing execute entirely locally; offline music plays seamlessly even when AI services are unreachable. |
Configuring AI Integration
- Go to Settings → Metadata, enable Auto-Completion and AI Enrichment as desired, and expand Advanced Options.
- Paste your API key in the DeepSeek section, click "Save Key," then click "Test Connection." The UI displays a masked key string and never echoes plaintext.
- Click "Refresh Model List" to select models available on your account. If the list cannot be retrieved, enter the correct model ID manually as prompted.
- Reopen a track or album page to observe curation progress and error hints. Repeated views serve cached metadata without making redundant network calls.
Cost & Metadata Reliability
AI API calls may incur charges according to your provider's pricing tier. Model selections for curation and search/fetch tools serve distinct tasks; refer to UI hints and token usage records.
Distinguish between citations, external web links, and "AI Knowledge." Content labeled as model knowledge has not been verified against external web pages; verify track titles, tracklists, and durations when auditing release dates or authorship.
Online curation transmits track titles and album names required for queries to your configured provider. Your API key is stored securely in local app configuration—never share, screenshot, or distribute it.
Tag Writeback, Covers & Data Backup
Tag Writeback Modifies Metadata Inside Audio Files
The tag writeback feature in Settings → Metadata embeds fetched tags and album covers directly into audio files. This is enabled by default, offering "Preview Writeback" and "Execute Writeback." File verification and original backups safeguard your files, but independent backups remain strongly advised before batch operations.
- Run "Preview Writeback" on a familiar album first to verify track titles, artists, album names, and cover art.
- Confirm results are accurate before executing writeback; never treat unverified AI metadata as authoritative tags.
- If files are read-only, stored on disconnected network shares, or lack write permissions, resolve access permissions first.
- Rescan your library if necessary after completion. Original file backups are preserved in the metadata backup directory.
When Covers or Artist Portraits Are Missing
Check whether the audio file has embedded artwork, or if standard cover files (cover.jpg, folder.jpg, front.jpg) exist in the album folder, then check online metadata settings and network access. Manually assigning album artwork is best for correcting specific albums; avoid wiping all local databases for a single missing image.
What to Back Up
| Data Item | Backup Considerations |
|---|---|
| Music Files | Library indexes cannot substitute for audio file backups. When tag writeback is executed, the audio files themselves are modified. |
| Settings & Queue | Preserves configuration, music folder directories, active queue, saved playlists, and favorites. |
| Data Directory & Cache | Houses the library database index, room correction profiles, and image caches; backing up the entire directory best preserves all relationships. |
| AI & Server Configurations | May contain API keys, usernames, or passwords. Safeguard your personal migration backups, and never include them in public feedback. |
When migrating to a new computer, drive letters, audio devices, and ASIO drivers often differ. Verify output devices and music folder paths before initiating playback.
Network Streaming, Input & Capture
Accessing Music from Your Personal Server
Settings → Streaming allows adding Navidrome / Subsonic or Emby servers. Enter the server URL (with http:// or https://), username, and password, then save and test the connection. You can store multiple servers, with one active at a time; your machine must have network access to the server.
Streaming to UPnP or DLNA Devices
- Ensure your PC and digital streamer, active speaker, or smart TV share the same local area network and that UPnP / DLNA MediaRenderer functionality is enabled on the target device.
- In the Streaming tab, click Discover Devices, select your target, and click "Cast Current Track." You can also cast directly from the Now Playing view.
- Monitor operational stages, target renderer, transport status, and streamed bytes. Being discovered on the network does not guarantee the device has started streaming playback.
- Stop network casting before switching back to local audio devices, and verify output settings.
Standard UPnP / DLNA streaming is supported; NAA has been completely removed. AirPlay, proprietary protocols, and UPnP are distinct technologies; an AirPlay badge alone does not imply UPnP compatibility. Inspect the Signal Path and active transmission telemetry to see streamed data formats and active DSP.
UPnP capability declarations and streaming telemetry help verify received audio specifications, but cannot audit internal volume, EQ, or secondary resampling inside the renderer hardware. Displaying "Unverified" must not be mistaken for proven end-to-end bit-perfect transmission.
Audio Capture & Loopback
Settings → Input handles microphone, line-in, or system loopback recording. WASAPI Input is supported; [none] disables capture. Select input device, channel offset, buffer, and recording duration, then follow on-screen prompts to start/stop.
Leaving the output path empty saves recordings to the default directory. Monitor captured frames, duration, peak, RMS, and overflow/underflow counters, then inspect files after completion. Passthrough monitoring routes captured audio to your output; placing a live microphone near speakers can cause acoustic feedback—lower volume and check wiring before enabling.
Troubleshooting No Audio & Stuttering
Troubleshooting No Audio: Narrow Down Methodically
- Confirm physical hardware is powered on, cables are securely connected, and input selectors are correct; verify that the bottom bar is not muted and that software and hardware volume levels are adequate.
- Check whether the playback progress bar advances and whether error messages appear. The Null Output backend processes audio without outputting sound to physical hardware.
- Navigate to Settings → Output to verify the active device and backend. Unplugging and reconnecting USB DACs can change endpoint identifiers in Windows.
- If the device is held in exclusive mode by another application, close the conflicting software or switch to Shared mode; avoid running multiple exclusive audio players simultaneously.
- Revert to PCM, source sample rate, device-supported bit depth, and stereo output. If rejected by rate family policies, explicitly configure your policy as outlined in Chapter 6.
- If playback still fails, retain log files and submit feedback as described in the next chapter. Avoid reporting "no sound" without error logs and hardware specifications.
Audio Stuttering, Clicking, or Abnormal Playback Speed
Such symptoms typically stem from device throughput bottlenecks, buffer underruns, or driver/computational stalls—do not assume they are digital clipping. Increase buffer size from 100 ms to 200 ms, lower target sample rates, select shorter filter presets, and monitor error counters.
Temporarily disable GPU acceleration and replay the identical track to isolate backend issues. Modify one parameter at a time and document results. Extremely long filters or high-multiplier DSD modulation may exceed your system's real-time hardware capabilities.
Exclusive Playback Unexpectedly Restarts
When an audio stream remains unresponsive for an extended period, watchdog safeguards trigger, falling back to WASAPI Shared and restarting playback from the beginning. Bit-perfect delivery is no longer maintained; inspect STARVING and FALLBACK_SHARED markers in the log. Shared mixer rates must still comply with family policies, which may prompt new restrictions.
DSD-Specific Troubleshooting
Confirm your DAC natively supports the target bitrate, DoP carrier, or Native DSD. WASAPI Shared cannot transport DSD; Native requires an ASIO driver with dedicated native DSD support. ISO / DST files are not identical to standard DSF tracks; convert them to supported standalone tracks when unsupported alerts appear.
Logs, Diagnostics & One-Click Feedback
Preserving Reproducible Diagnostic States
Record file format, playback timestamp, device name, backend, output mode, target rate, and observed symptoms. For example: "Brand DAC, WASAPI Exclusive, 44.1 kHz FLAC, manual 192 kHz, errors immediately upon clicking play." For audio anomalies, note whether pausing, skipping tracks, or restarting restores normal playback.
In-App Feedback Submission
- Navigate to Settings → Diagnostics. Choose a feedback category, enter a descriptive title, detailed explanation, and reproduction steps.
- Click "Preview Payload First" to audit diagnostic data and your submitted text.
- After reviewing, click "Submit Feedback." The application bundles release version, OS details, audio devices, settings, and sanitized log tails with sensitive data stripped.
- Check the submission result. Successful upload is confirmed only when the upload receipt is displayed; if credentials are missing or network calls fail, diagnostics are stored locally with the local file path and error details provided.
- When delivering diagnostics manually, locate the file at the local path specified in the result. Never transmit raw config files containing API keys.
Common Log Terminology
| Log Event | Technical Meaning |
|---|---|
| START/END | Marks the start and conclusion of a playback session. The error string on the END line is vital for root-cause diagnosis; a session end itself is not necessarily a failure. |
| RATE_FAMILY_BLOCKED | Source rate and target rate conflict with current sample rate family policies; verify policy and target rate settings. |
| EXPLICIT_REJECT/RATEPROBE_EMPTY | Manual target rate is unsupported by the endpoint, or device capabilities were not detected cleanly; do not assume automatic success. |
| DEVICE_IN_USE/DEVICE_LOST | Audio endpoint is locked by another process or the device was disconnected. |
| STARVING/FALLBACK_SHARED | Sustained throughput starvation triggered fallback to Shared mode; examine timestamps, actual sample rates, and buffer statistics. |
| PLAY_ABORT | Playback was interrupted by a new play or stop command before a single audio frame could be output; check command sequencing. |
Previewing diagnostics does not transmit data. Never publicly upload your entire local app data directory; automated redaction cannot substitute for your own audit of personal information in titles, descriptions, and screenshots.
Updates, Backups & Common UI Questions
Before and After Updating
Settings → About & Updates displays the active version and checks for updates. The download process retrieves differential package files and verifies hashes; restart the app when prompted upon completion. If network access to update servers is blocked, download official full bundles from trusted sources.
In-app updates are designed to replace program binaries while safeguarding personal configurations. Backing up settings, playlists, and acoustic calibration sets prior to updating remains recommended. When extracting a new full bundle into a separate directory, preserve the old folder until data migration and paths are verified.
Blank Screen or Application Launch Failure
Check whether the full bundle was extracted completely, verifying that WebView2Runtime and WebView2Loader.dll are present and not quarantined by antivirus software. Re-extract trusted official bundles into a standard user-writable directory; never download individual loose DLLs from unverified websites. Consult launcher.log to diagnose launch stalls.
Settings Saved but Values Do Not Take Effect
Confirm that you clicked "Save Settings," then stop and restart playback. Reopen Settings to audit values, inspecting the Signal Path for live hardware values rather than relying solely on dropdown menus. Restoring defaults wipes custom parameters; note essential settings beforehand.
AI or Image Queries Yielding No Results
Distinguish between local file readability, network reachability, and account authorization. For AI, check API keys, connection tests, model IDs, and account balances; for covers, verify embedded tags and folder images. Asynchronous background retrieval and caching may not update views immediately; do not mistake metadata latency for an audio glitch.
Track Version Comparison
Right-click any track to launch Version Comparison. Comparing files is designed for identical musical works or recordings; significant differences in edits, cuts, or durations can prevent proper alignment and similarity scoring. Results provide diagnostic comparison; a single numerical score cannot determine which master sounds superior.
Never delete your entire configuration directory or music library to troubleshoot an isolated UI issue. Preserve the diagnostic state, and apply reversible adjustments one at a time.
Common Shortcuts & Audio Formats
Keyboard Shortcuts
Verified against current UI scripts. When text boxes, dropdowns, or text areas have input focus, playback shortcuts will not intercept text input; selected rows in PEQ feature dedicated arrow-key navigation.
| Key | Operation |
|---|---|
| Space | Play / Pause |
| ←/→ | Previous / Next Track |
| Shift+←/→ | Rewind / Fast Forward 5 Seconds |
| ↑/↓ | Volume Up / Down by 1 dB |
| n/p/s | Next Track / Previous Track / Stop |
| l | Lyrics |
| i | Signal Path |
| Ctrl+F | Focus Global Search Bar |
| Esc | Closes right drawer, Now Playing view, active modal dialog, or navigates back based on active hierarchy |
Supported Audio Formats
| Category | Supported Extensions |
|---|---|
| PCM & Common Lossless | WAV, FLAC, AIFF, ALAC / M4A, WavPack, etc.; supported specifications depend on source files and output hardware. |
| Common Lossy Formats | MP3, AAC, OGG / Vorbis, Opus, etc., handled via bundled decoders. |
| DSD | DSF, DFF; configured for PCM conversion, DoP, or Native DSD based on hardware. Compressed DST and ISO image archives are not supported standalone DSD tracks. |
| CUE | Displays and plays individual tracks based on accompanying audio images; a standalone CUE sheet cannot play without the referenced audio file. |
When encountering unsupported alerts for ISO / SACD-ISO / DST, extract them into standard DSF / DFF tracks using specialized extraction tools. Audio CD support depends on optical drive hardware and specific OS subsystems, and should not be treated as a universal certified ripping solution across all drives.
Data Files & Feedback Channels
Standard Application Data Files & Directories
| File or Directory | Purpose & Configuration |
|---|---|
| rlplayer-settings.conf | General user preferences and configurations. |
| rlplayer-library.conf | Configured local music library directory paths. |
| rlplayer-playlist.txt | Active playback queue; managed independently from saved playlists. |
| rlplayer-savedqueues.conf | Named playlists and track orders. |
| rlplayer-favs.json | Favorite tracks. |
| rlplayer-peq.txt | Active 20-band PEQ parameters. |
| rlplayer-llm.conf | AI service configurations; may contain API keys, handle with care. |
| rlplayer-sources.conf | Network streaming server credentials and endpoints. |
| data/covercache/artistimg | Music database indexes, acoustic calibration profiles, and artwork caches. |
| rlplayer-meta/backups | Tag writeback metadata records and original file backup archives. |
| rlplayer-playback.log/launcher.log | Playback runtime and launcher diagnostic logs. |
| recordings | Default output directory for captured audio recordings when no path is specified. |
Command-Line Tools & Offline Analysis
The tools folder in the full release bundle provides diagnostic and measurement utilities. Standard users should prioritize the graphical interface. The --analyze flag in rtaplay executes offline processing without initializing audio hardware; review documentation for other tools before feeding unknown test signals to active speakers or headphones.
Contact & Licensing
Community & Feedback QQ Group: 895816505 Issue Tracker: https://github.com/okhuoyanyan/RLPlayer-feedback/issues Official Website: https://rlplayer.rainlain.com
In-app feedback entry: Settings → Diagnostics. Preview payloads before submission; check local output paths if network calls fail. Software licensing and third-party notices are detailed in LICENSE, THIRD-PARTY-NOTICES.txt, and OPRA-NOTICE.txt in the release bundle.